Using the iOS SDK
7iOS SDK allows your app users to receive push notifications from your Dotdigital account. Dotdigital collects your user's email addresses which is then used to identify them so you can send push notifications.
Our iOS SDK uses the Apple Push Notification Service (APNS) to send push notifications to your contacts.
Our iOS SDK is open source and can be found along with an Objective C sample app and Swift sample app in Githubs below:
To set up push notifications for native iOS apps, complete the following tasks:
- Ensure your app is registered for APNS use
- Install the iOS SDK
- Configure the iOS SDK
- Initialise the iOS SDK
- Get the SDK client object
- Start a session
- Get permission and register the push token
- Handling push notifications
Installing the iOS SDK
In order to install the SDK, we will use CMPComapiFoundation, a dependency manager for iOS/MacOS projects:
Swift Package Manager (SPM)
- Open your project in Xcode.
- Select File > Add Package Dependencies... from the menu bar.
- Paste the repository URL:
https://github.com/comapi/comapi-sdk-ios-objc-spminto the top-right search bar. - Set your preferred Dependency Rule (e.g., Up to Next Major Version).
- Click Add Package.
- Select
CMPComapiFoundation, assign it to your app target, and click Add Package again.
Now move on to initialising the SDK
Cocoapods
To add the iOS SDK to your Xcode project with CMPComapiFoundation, do the following:
- Add the iOS SDK
# other podfile info

target '*Your-Target*'
use_frameworks!

pod 'CMPComapiFoundation'

end- Install the iOS SDK
$ pod install- Import the iOS SDK in your Objective-C or Swift file
#import <CMPComapiFoundation/CMPComapiFoundation.h>import CMPComapiFoundationAPNS Environment setup
It is important to ensure your app builds are setup correctly for APNS, so that our SDK can detect whether to use the sandbox APNS (for development builds) or the production APNS (for production, ad-hoc distribution or test-flight builds).
Failure to set the APNS environment correctly for a build will result in no pushes being received!
Development builds push setup
During development, a Apple provisioning profile will be used to sign and deploy your app to a handset. To ensure push works with your app, ensure the following:
- Your app provisioning profile includes the Push Notification entitlement
- You have uploaded a the correct p8 (private key) to Dotdigital, supplied the correct Bundle identifier for your app, Apple team id and private key id
- Your iOS XCode projects build settings must have the Preprocessor Macro of DEBUG=1 in it's build settings, as follows:
- Swift based projects you add it by doing:
- Open your Project Build Settings and search for Swift Compiler – Custom Flags … Other Swift Flags
- Add -DDEBUG to the Debug section
- Add -DRELEASE to the Release section
- For Objective-C based projects:
- Open your Project Build Settings and search for Preproccessor Macros
- Add DEBUG=1 to the Debug section
- Add DEBUG=0 to the Release section
- Swift based projects you add it by doing:
- You have included an entitlements file in your app with the following entry:
<?xml version="1.0" encoding="UTF-8"?>
<!DOCTYPE plist PUBLIC "-//Apple//DTD PLIST 1.0//EN" "http://www.apple.com/DTDs/PropertyList-1.0.dtd">
<plist version="1.0">
<dict>
	<key>aps-environment</key>
	<string>development</string>
</dict>
</plist>
App Store / Adhoc distribution / Test-flight builds push setup
For any other build type other than development you will need to ensure the following are all correct:
- Your app provisioning profile includes the correct Push entitlement
- You have uploaded a the correct p8 (private key) to Dotdigital, supplied the correct Bundle identifier for your app, Apple team id and private key id
- Your iOS XCode project must have the compiler Preprocessor Macro of DEBUG=0 in it's build settings or not defined, otherwise the SDK will register to use APNS sandbox instead of APNS production! To do this:
- Swift based projects you add it by doing:
- Open your Project Build Settings and search for Swift Compiler – Custom Flags … Other Swift Flags
- Add -DDEBUG to the Debug section
- Add -DRELEASE to the Release section
- For Objective-C based projects:
- Open your Project Build Settings and search for Preproccessor Macros
- Add DEBUG=1 to the Debug section
- Add DEBUG=0 to the Release section
- Swift based projects you add it by doing:
- The entitlements file in your app has the following entry:
<?xml version="1.0" encoding="UTF-8"?>
<!DOCTYPE plist PUBLIC "-//Apple//DTD PLIST 1.0//EN" "http://www.apple.com/DTDs/PropertyList-1.0.dtd">
<plist version="1.0">
<dict>
	<key>aps-environment</key>
	<string>production</string>
</dict>
</plist>
Initialise
To initialise the SDK, you will need a few pre-requisites listed below:
- To have configured a push notification profile in your Dotdigital account
- An authentication provider that can generate a JWT (JSON Web Token) that matches the auth scheme given to you in your push notification profile.
In order for the client to be able to start a session, the config's authenticationDelegate object must conform to the protocol's method:
NSString *id = <Portal's authentication tab ID claim value>;
NSString *issuer = <Portal's authentication tab issuer value>;
NSString *audience = <Portal's authentication tab audience value>;
NSString *secret = <Portal's authentication tab secret value>;

- (void)client:(CMPComapiClient *)client didReceiveAuthenticationChallenge:(CMPAuthenticationChallenge *)challenge completion:(void (^)(NSString * _Nullable))continueWithToken {
  	// request a JWT token from your provider (backend server)
  	// example call
  	[YourProviderServer getTokenForNonce:challenge.nonce id:id issuer:issuer audience:audience secret:secret completion:^(NSString * token, NSError * error) {
    		// call continueWithToken block with generated token
        if (token && !error) {
            continueWithToken(token);
        }
    }];
}
extension LoginViewModel: AuthenticationDelegate {
func client(_ client: ComapiClient, didReceive challenge: AuthenticationChallenge, completion continueWithToken: @escaping (String?) -> Void) {
let token = YourProviderServer.generate(tokenFor: challenge.nonce, profileId: loginInfo.profileId!, issuer: loginInfo.issuer!, audience: loginInfo.audience!, secret: loginInfo.secret!)
continueWithToken(token)
}
}A JWT is used to securely transmit information between parties as a JSON object; it's digitally signed, therefore the information can be verified and trusted. For more information on JWT, click here.
The JWT needs to include claims from the authentication panel in the dashboard. For further guidance, please click here.
Here's an example implementation of a token generator in Objective-C using JWT:
#import "CMPAuthenticationManager.h"
#import <JWT/JWT.h>

@implementation CMPAuthenticationManager

+ (NSString *)generateTokenForNonce:(NSString *)nonce profileID:(NSString *)profileID issuer:(NSString *)issuer audience:(NSString *)audience secret:(NSString *)secret {
    NSDate *now = [NSDate date];
    NSDate *exp = [NSCalendar.currentCalendar dateByAddingUnit:NSCalendarUnitDay value:30 toDate:now options:0];

    NSDictionary *headers = @{@"typ" : @"JWT"};
    /* Claims notes:
       ID claim, this claim name must be the same as the value of the 'ID claim' field in your push notification profile in Dotdigital,
       the default value is 'sub', and the value of the claim must be a consitent unique value for the app user.

       'aud' audience claim must be the same as the value of the 'Audience' field in your push notification profile in Dotdigital.

       'iss' audience claim must be the same as the value of the 'Issuer' field in your push notification profile in Dotdigital.
    */
    NSDictionary *payload = @{@"nonce" : nonce,
                               @"sub" : profileID,
                               @"iss" : issuer,
                               @"aud" : audience,
                               @"iat" : [NSNumber numberWithDouble:now.timeIntervalSince1970],
                               @"exp" : [NSNumber numberWithDouble:exp.timeIntervalSince1970]};

    NSData *secretData = [secret dataUsingEncoding:NSUTF8StringEncoding];
    id<JWTAlgorithm> algorithm = [JWTAlgorithmFactory algorithmByName:@"HS256"];

    NSString *token = [JWTBuilder encodePayload:payload].headers(headers).secretData(secretData).algorithm(algorithm).encode;
    return token;
}

@end

/* Note that this should preferably be generated by your backend, the app should only retreive the token through an HTTP call */
import JWT
class JWTokenGenerator {
struct AuthHeaders {
static let HeaderType = "JWT"
}
static func generate(tokenFor nonce: String, profileId: String, issuer: String, audience: String, secret: String) -> String {
let now = Date()
let exp = Calendar.current.date(byAdding: .day, value: 30, to: now)!
let base64SecretKey = secret.data(using: .utf8)!
let headers = ["typ" : NSString.init(string: AuthHeaders.HeaderType)] as [AnyHashable : Any]
let claims = ["nonce" : NSString.init(string: nonce),
"sub" : NSString.init(string: profileId),
"iss" : NSString.init(string: issuer),
"aud" : NSString.init(string: audience),
"iat" : NSNumber(value: now.timeIntervalSince1970),
"exp" : NSNumber(value: exp.timeIntervalSince1970)] as [AnyHashable : Any]
let algorithm = JWTAlgorithmFactory.algorithm(byName: "HS256")
let e = JWTBuilder.encodePayload(claims)!
let h = e.headers(headers)!
let s = h.secretData(base64SecretKey)!
let b = s.algorithm(algorithm)!
let token = b.encode
print(token!)
return token!
}
}Configuring the iOS SDK
Before you can configure the iOS SDK, you need the following:
- The value of the API space ID field in Dotdigital
- A class that creates a JWT token
- Your app must be set up so that it asks the user for permission to send push notifications.
To configure the iOS SDK:
-
Create a new instance of the
CMPComapiConfigclass and store it in a variable -
As the first argument of the
CMPComapiConfiginstance, pass your API Space ID -
As the second argument of the
CMPComapiConfiginstance, pass an instance of a class that creates a JWT token -
Dependent on the package you have imported do the following:
- Swift Package Manager
- This version of the library requires setting
developmentorproductionin theCMPComapiConfigpassed to the SDK initialization method. e.g. -
ComapiConfig().setApnsEnvironment("production")
- This version of the library requires setting
- Cocoapods
- Your app build configuration must include the XCode compiler variable (Preprocessor macro) DEBUG=1 for debug builds to ensure that the sandbox APNS environment is used. This is often already set for debug builds in XCode.
- Swift Package Manager
// create a config object with your api-space-id and an object conforming to CMPAuthenticationDelegate protocol;
CMPComapiConfig * config = [
  [
    [
      [[CMPComapiConfig alloc] init]
      setApiSpaceID: @ "<API_SPACE_ID>"
    ]
    setAuthDelegate: <CMPAuthenticationDelegate_Conforming_Object>
  ] <CMPAuthenticationDelegate_Conforming_Object>
];

CMPComapiClient * client = [CMPComapi initialiseWithConfig: config];

// we can use the client object now
let apiConfig = APIConfiguration(scheme: scheme, host: host, port: UInt(port)!)
let config = ComapiConfig()
.setApi(apiConfig)
.setAuthDelegate(self)
.setApiSpaceID("<API_SPACE_ID>")
.setApnsEnvironment("production")
Retrieving the client
The client can be retrieved either as a separate object using:
CMPComapiClient *client = [CMPComapi initialiseWithConfig:config];
// client instance ready to use
client = Comapi.initialise(with: config)or as a singleton:
[CMPComapi initialiseSharedInstanceWithConfig:config];

CMPComapiClient *client = [Comapi shared];
// shared client ready to use
let client = Comapi.initialiseSharedInstance(with: config)Sessions
Starting a session
To receive push messages and register push tokens the SDK requires an active session. Once a session has been created the SDK will automatically renew it when it expires until the session is explicitly ended (see below). The call to start a session will is safe to repeatedly call as it will only start a new session if required to do so.
To create a session you must have successfully initialized and retrieved a client object, you need to be able to identify the app user so that the sub claim in the JWT can be populated for the user; when the SDK requests the JWT in order to start the session. To create a session call:
[client.services.session startSessionWithCompletion:^{
  // session successfully created
} failure:^(NSError * _Nullable error) {
  // error ocurred
}];
client.services.session.startSession(completion: { [weak self] in
// Session started
completion(nil)
})
}) { (error) in
completion(error)
}Ending a session
You only have to end a session if you want to stop the app receiving push notifications, or you want to change users on the app.
To end the current session, call:
[client.services.session endSessionWithCompletion:^(CMPResult<NSNumber *> * result) {
    if (result.error) {
      // error occurred
    } else {
      BOOL success = [result.object boolValue];
      if (success) {
        // session successfully ended
      }
    }
}];
client.services.session.endSession(completion: { [weak self] in
// Session ended
completion(nil)
})
}) { (error) in
completion(error)
}Ask users' permission to send them push notifications
To receive push notifications, app users must give their permission.
Call the application(_:didRegisterForRemoteNotificationsWithDeviceToken:) method to get the deviceToken string and pass it to the setPushToken() method on the ComapiClient object.
Device token string formattingSince iOS 13 the NSData deviceToken format has changed and you cannot simply cast the deviceToken to string to pass to the SDK, as this will corrupt the token. Instead the deviceToken must be converted to a hexidecimal string from the bytes. The code below shows how this can be done.
An APNS token should look like this: 02df25c845d460bcdad7802d2vf6fc1dfce97283bf75cc993eb6dca835ea2e2f
Note, if it is correct it will be a 64 character hex string.
- (void)application:(UIApplication *)application didRegisterForRemoteNotificationsWithDeviceToken:(NSData *)deviceToken {
    NSMutableString *token = [NSMutableString string];

    // Convert the deviceToken bytes to a hexidecimal string
    const char *data = [deviceToken bytes];
    for (NSUInteger i = 0; i < [deviceToken length]; i++) {
        [token appendFormat:@"%.2hhx", data[i]];
    }

    // Pass the hexideicmal string version of the token to the SDK to use
    if (token) {
        CMPComapiClient *client = [Comapi shared];
        if (client) {
            [client setPushToken:token completion:^(BOOL success, NSError * error) {
                if (error || !success) {
                  	// Error occurred
                    NSLog(@"%@", error.localizedDescription);
                } else {
                    // Success
                }
            }];
        }
    }

    // The rest of you push notification code
}
func application(_ application: UIApplication, didRegisterForRemoteNotificationsWithDeviceToken deviceToken: Data) {
let token = deviceToken.map { String(format: "%02.2hhx", $0) }.joined()
client?.set(pushToken: token, completion: { (success, error) in
if error != nil || !success {
print(error!)
// Error registering APNS token
} else {
// APNS Token registered successfully
}
})
}
Only users that have both an email and push token will be created in DotdigitalPlease read the Registering your app users for push page to understand the requirements for syncing your app users with Dotdigital. Only users who have both an email address and a push token will be synced and eligible to receive push messages.
Handling push notifications in your app
The SDK will handle most of the work required when receiving push notifications, however you will need to implement a callback to handle:
- Displaying push notifications whilst the app is foregrounded, as push notifications are displayed only while the app is in the background. You will need to receive the push message and implement your own solution for displaying the push messages when the app is foregrounded.
- Reading any deep links passed with the push message which are used to drive actions off a push tap, but these will be invoked for you automatically, so this is only if you want to know what deep link was called.
- Receiving any custom data passed via the push message, this data is often used to drive functionality in the app from a push tap
No push messages being shown when the app is foregroundedIf you do not implement this callback you will not see push messages when your app is foregrounded. The callback is used to receive a push message when the app is foregrounded so that you can decide how to display it, as iOS has no standard way of doing this.
- (void)userNotificationCenter:(UNUserNotificationCenter *)center didReceiveNotificationResponse:(UNNotificationResponse *)response withCompletionHandler:(void (^)(void))completionHandler {
  // initialise SDK to obtain ComapiClient instance
  [client handleNotificationResponse:response completion:^(BOOL isDeepLinkLaunched, NSDictionary * _Nonnull data) {
  // isDeepLinkLaunched - If true that means that sdk managed to open the deep link sent in the notification
  if (data[@"dd_deepLink"]) {
    // This is how you can extract the deep link or URL
    NSString *url = data[@"dd_deepLink"][@"url"];

  } else if (data[@"dd_data"]) {
    // Custom data part of the Dotdigital push message
    NSDictionary *ddData = data[@"dd_data"];

    // Add any custom data processing functionality here
    //
  }

  // To extract the alert message for display if foregrounded
  if (data[@"aps"]) {
     NSString *message = data["aps"]["alert"];
  }

  // Indicate complete
  completionHandler()
  }];
}
func userNotificationCenter(_ center: UNUserNotificationCenter, didReceive response: UNNotificationResponse, withCompletionHandler completionHandler: @escaping () -> Void) {
// Initialise SDK to obtain ComapiClient instance
client?.handle(notificationResponse: response, completion: { [weak self] (didHandleLink, data) in
// didHandleLink - If true that means that SDK managed to open the deep link sent in the notification
// Get the deep link if set
if let deepLink = data["dd_deepLink"] as? NSDictionary, let url = deepLink["url"] as? String {
// Read the deep link from "deepLink" and the URL from "url"
} else if let data = data["dd_data"] as? NSDictionary {
// Read custom data from "data"
}
if let aps = data["aps"] as? NSDictionary {
// Get the push alert message for display if the app is foregrounded
let message = aps["alert"] as? String
}
completionHandler()
})
}Silent pushes
If you want to receive custom JSON data sent via Dotdigital to trigger actions within your app without notifying the user that a push message has arrived (silent push) then you will need to also implement the didReceiveRemoteNotification callback function which will be called then data is received, and the data is contained in the dd_data dictionary item:
- (void)application:(UIApplication *)application didReceiveRemoteNotification:(NSDictionary *)userInfo fetchCompletionHandler:(void (^)(UIBackgroundFetchResult))completionHandler {
  NSDictionary *ddData = userInfo[@"dd_data"];
  completionHandler(UIBackgroundFetchResultNewData);
}
func application(application:UIApplication!, didReceiveRemoteNotification userInfo:NSDictionary!, fetchCompletionHandler completionHandler:(UIBackgroundFetchResult)->Void) {
let ddData:NSDictionary! = userInfo["dd_data"]
completionHandler(UIBackgroundFetchResultNewData)
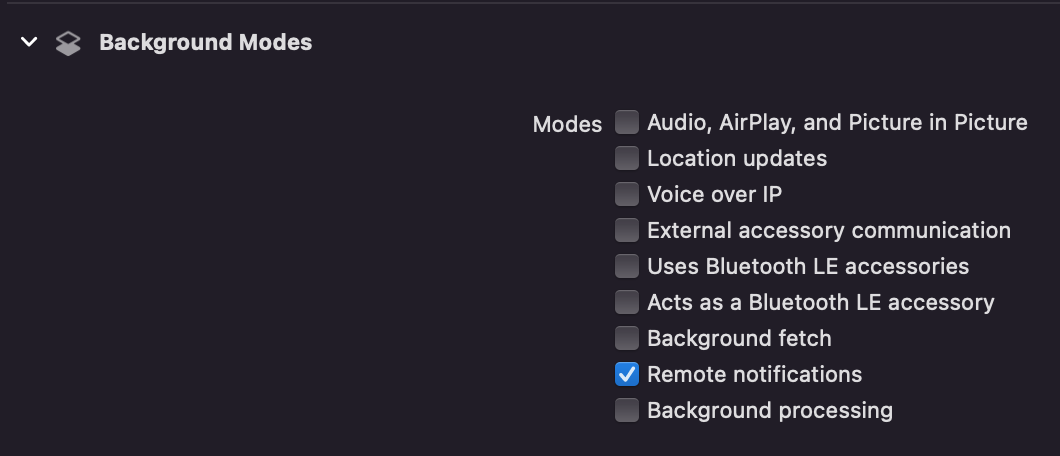
}Also please ensure that you have enabled your app to receive remote notifications in your projects Background Modes options:
For more information on pushing data to your app please see here
Next stepsNow ensure your app passes an email address to the SDK for the app user to ensure they get a contact created in Dotdigital by following these instructions
Want to know more about the SDK?To find out more about the SDK and it features and functions please go here